Friday, February 15, 2019

The Ambush Pt III

Getting the first card, the French 2nd RIMC squad counterattacked very successfully. 8 VM were dropped and one more were shaken. The VM response was just as deadly, inflicting 4 KIAs and 1 Pin.
                                                                         
The VM 2nd Co charged the M8 HMC and four climbed on top. While two were shot down by defensive five, they inflicted one casualty on the crew. They also dropped another French trooper holding the line. The desperate crew backed up into French lines (what there were!), and one of the VM was cleaned off the tank while the other was Shaken. 
At the head of the column, the French poured desperate fire into the jungle from which the 1RR was supposed and with the VM rolling a miserable 1 for defense, they did get one Shaken (upper right of photo). The RR returned fire and destroyed a 3/4 ton truck.
VM mortar fire destroyed a Scout Car and 3/4t truck while damaging a further truck and scout car! The RR and 4MMG in the south were not so successful. While the RR damaged s Scout Car, French return fire finally hit home (or was lucky depending on your point of view). 
The 4MMG received a Shaken
But the RR was the real loser. (upper left of photo) Rolling yet another 1 as its defensive roll, the French took out two of the crew! Fighting on this sector was nearly over.
Turn 5 sees the 1VM Co get the initiative and it sweeps up the road shooting down 3 and Pinning one more. When the 3French Squad activates it pours a lot of fire into 1VM Co...but they throw 7 1s and 2s! Even with such horrendous luck, they are able to clear the last VM off the M8 HMC and an additional two VM.
The 2VM Co gets the next call, but they are not as effective, only getting a Shaken on a LMG. The French rolling a 6, and two 5s were helpful to say the least. French assistance is coming from the head of the column but they too only gain a Shaken. The VM mortars fire and again further damage a Scout Car. Two miss however, but bad luck then claims some friendly fire. The last mortar overshot an ambulance (left center) and it kills one VM, Shakes another, all the while missing the lone Frenchmen in the blast!
The 1French Squad is ineffective firing into the jungle, but the M8 AC does well again. It fires towards the suspected 1RR position, the VM obligingly rolls a 2 for its defense, and the French score 
2 Shaken and a Pin. The VM MMG open up but only one scores hits (center right), taking down two French (upper left)
Losses for the VM heavy weapons were totally unexpected (luck for the French here), forces one MMG and a RR to retire, while the second RR was silenced. Recognizing the tide turning, the VM Battalion commander orders the bugles to sign the withdraw. 
But before the VM can react, the 3FSquad gets the initiative and drops 5 and 1 Shaken. To make things worse, the 2FSquad gets the right card drawn and they add another 2 KIA and 1 Pin. Finally the VM gets their two Cos to withdraw

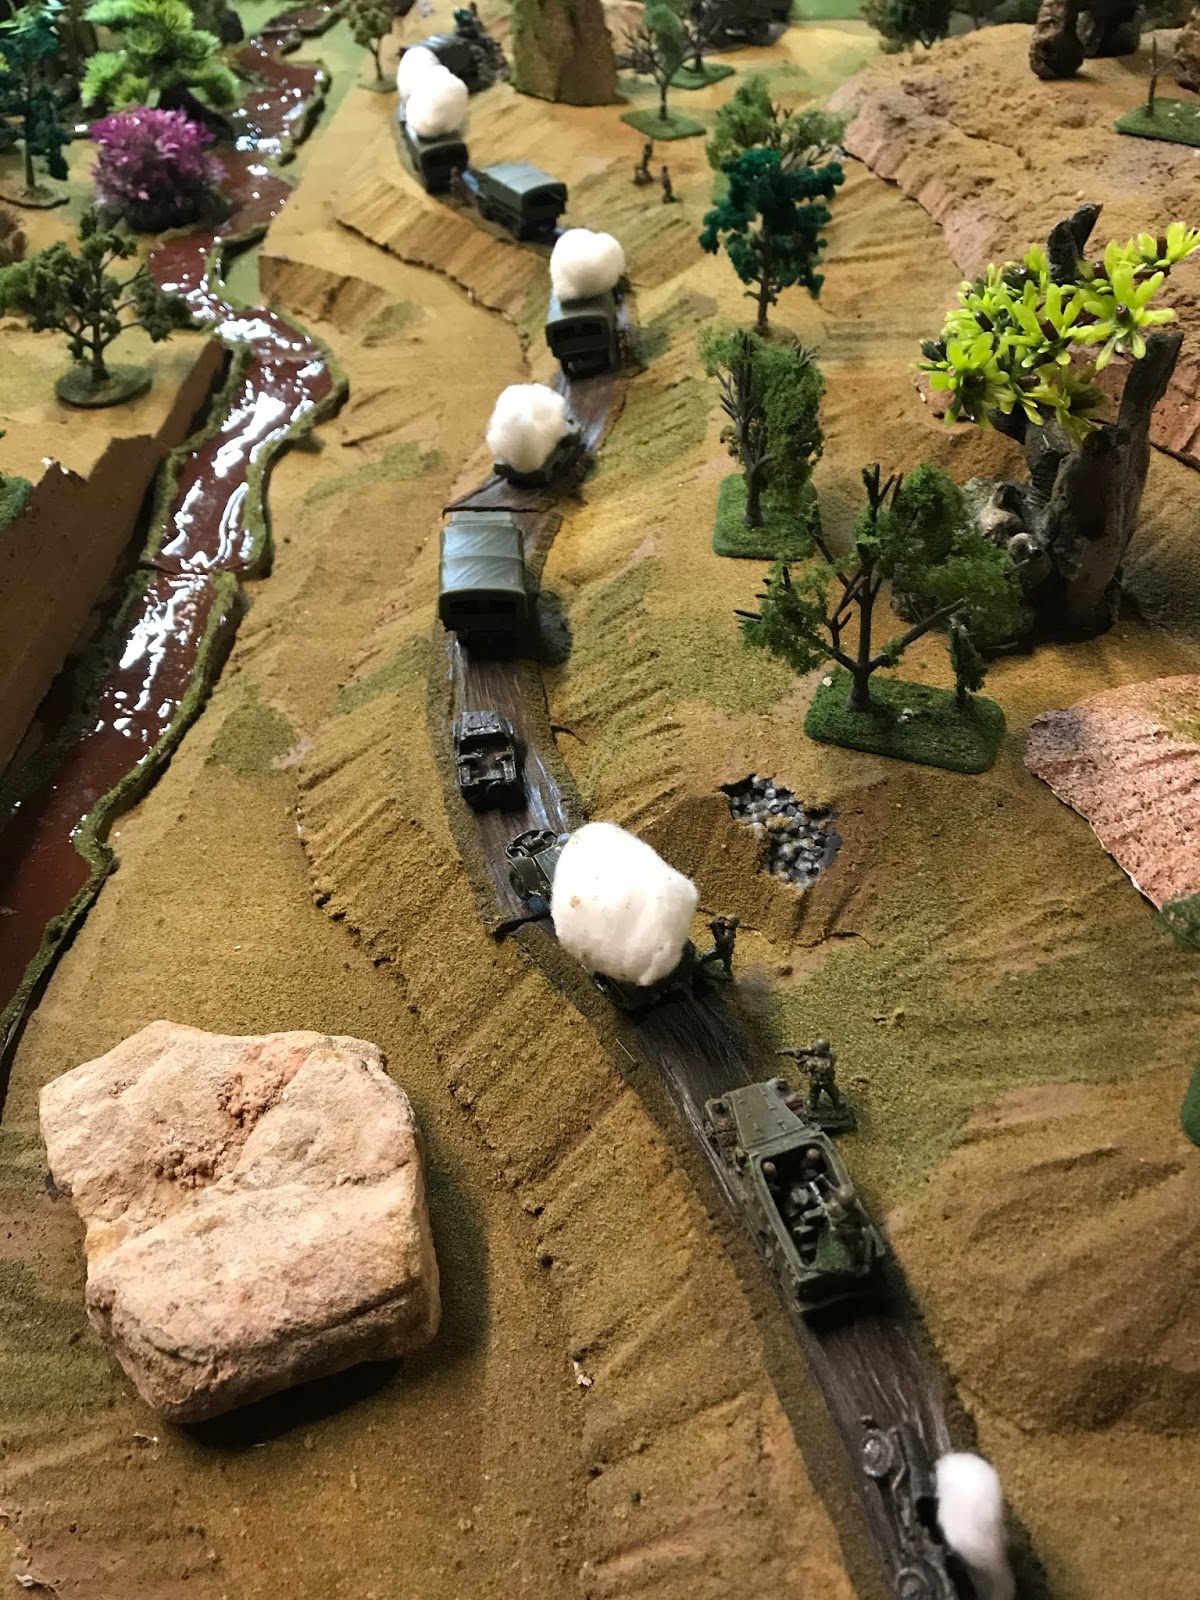
The VM heavy weapons then successfully withdraw, leaving 2 POWs to be grabbed (they had been shaken), and the French survivors breath a sigh of relief! The final view at the head of the column
 and the rear:

Total losses show the cost:
French: 3Jeeps/9; 5 3/4T Trks/7; 8 Trks/14; 1SC/4; 2HT/3; 13/ForLeg/25; and 13 RIMC/32
VM: 34/80 men including 4 men from the Hvy Weapons. Was a great game

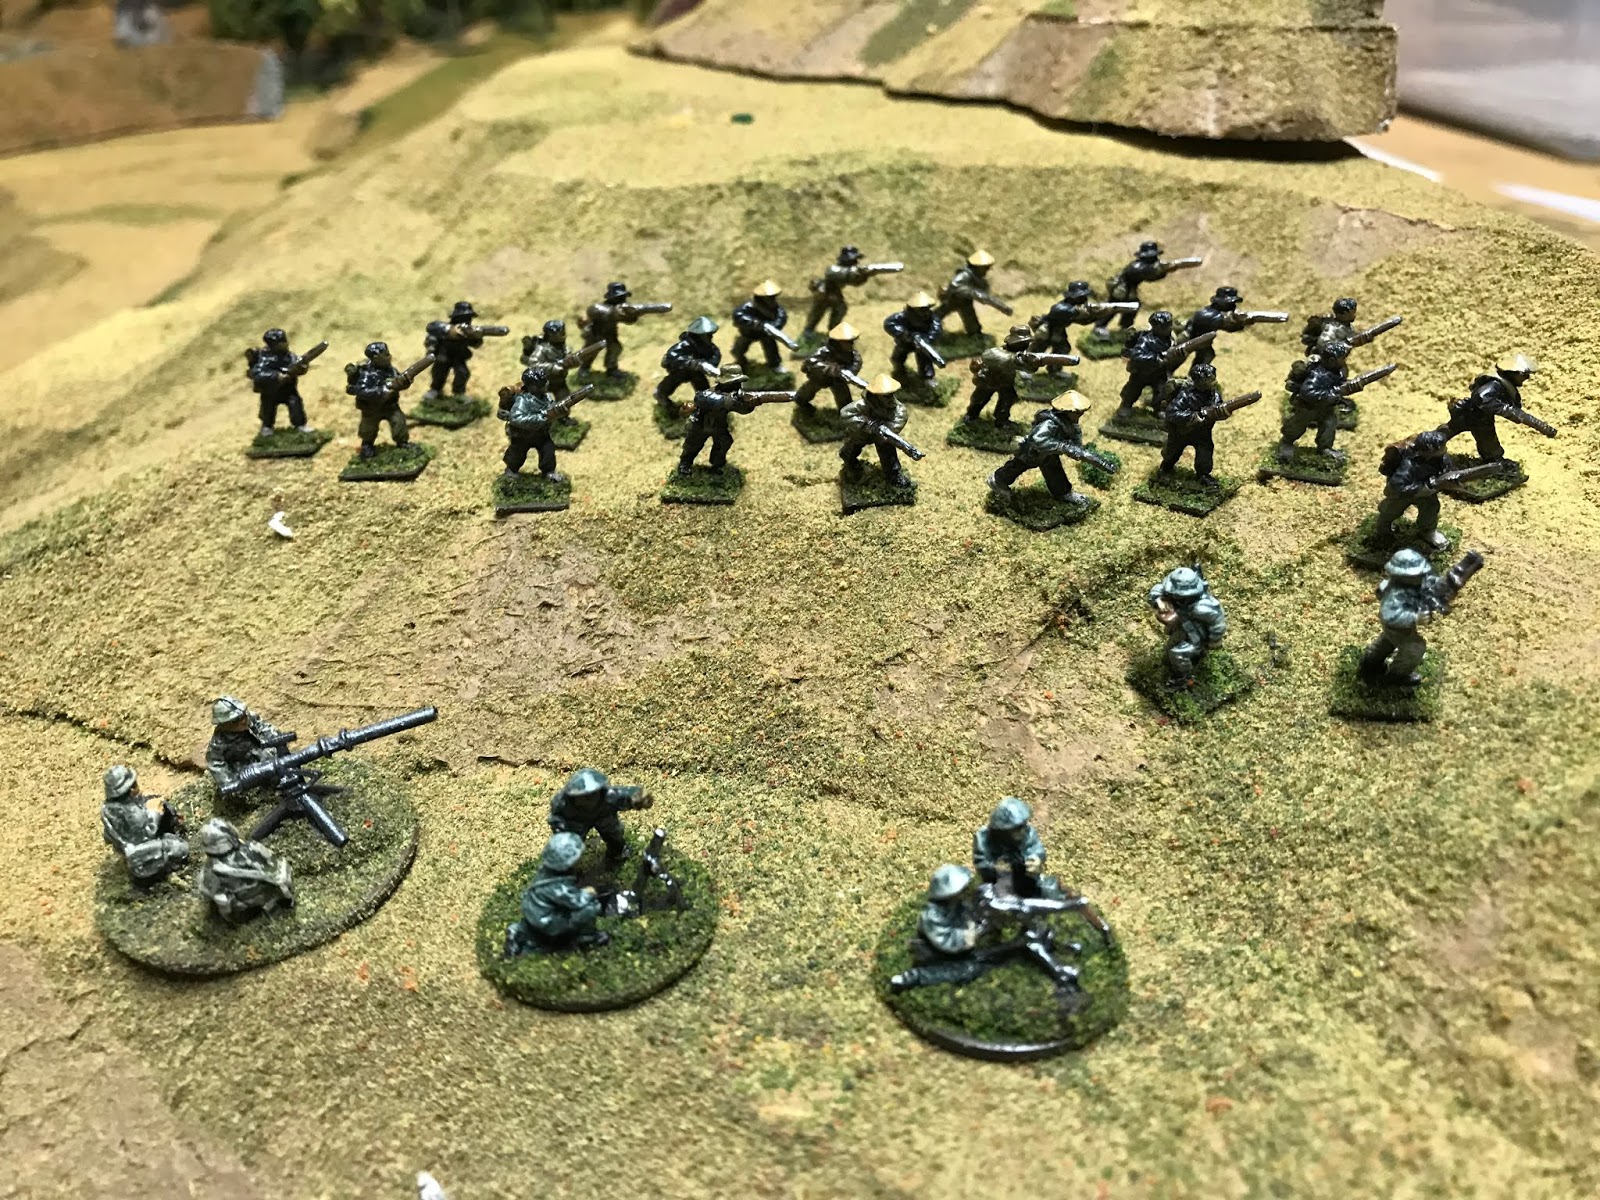
Here are some close-ups of the figs themselves; first, the VM. The MMG, Mortars, and RR crew are from Eureka (Highly recommended). The regular troops are from Peter Pig, VietCong with bolt rifles. This being 1949 and the full assistance from Red China had yet to arrive, the soldiers were a bit rough looking:
Next up are the Foreign Legionnaires who drove the convoy; they are all Eureka. The Jeep and 3/4T are Old Glory, Command Decision. The truck on right I believe if I remember correctly a very old Roskopf (?)
Finally the Moroccans of the RIMC, from Old Glory as well as the HT. The Scout Car, Jeep and M8 HMC are from Flames of War.
Hope you enjoyed, let me know what you think, as I can always try harder.


Thursday, February 14, 2019

The Ambush RC 4 Part II

The VM cards come up twice to begin the turn and fire both RR and all mortars...and they all miss!  Fortunately their luck is a little better as two of the MMG caused two trucks to explode, while a third gets a 3/4T truck and its driver! There is ineffective French fire desperately seek out the enemy heavy weapons.

 
 The VM now launch their 1st Company towards the convoy and drop one of the Legionnaire drivers. The 2nd Company soon follows and they do even better, silencing two drivers. The French M8 HMC turns and fires long at the advancing Viet! The French RICM troops fall back slightly to consolidate.

Turn Three sees the VM gain the first card again, and the second Co continues to advance while laying down fire. They succeed in dropping the LMG in the Scout Car and one other Moroccan. The French return fire this time however, is deadly and six VM go down!
At the front of the convoy, the French luck continues as the M8 AC gets shots in on the 1MMG and kills one (The Viet rolled a 1 for their defense!), and pins the other. Under my scenario rules if a VM crew-served weapon loses half their crew, the remainder will withdraw saving the weapon)
VM mortars continue to fire, although the first two miss their marks. The last two do rub out two more trucks. The VM 2nd company charges towards the M8 HMC which fires short again this time!
As stated earlier, the VM RR were all misses this turn, close to the Scout car, but still a miss.
And finally, the French RIMC troops here are moving forward down the column to consolidate as well, leaving a LMG and two riflemen to hold the rear. They are banking on the fact that no VM troops have yet appeared. They better be correct or those three troopers will be in a world of hurt!
By the end of the Turn, French losses are mounting and there are numerous burning wrecks littering RC 4.


A Viking/Saxon SeaBattle

Tried out a new idea using SAGA II rules. W have one Viking Longship stalking two Saxon Cogs bearing a lucrative hostage that could be ransomed for a great deal of wealth. The Viking force is 4 pts strong; a Warlord with x2 4 fig Hearthguards, x1 x8 fig Warrior band, and x1 x12 fig Levy with bows. The Saxons have the same number of pts but are divided into two boats. The first contains a x12 fig Levy with bows and a x4 fig Hearthguard. On the second Cog is the Warlord, the Princess, another x4 fig Hearthguard and a x8 fig Warrior band.

The Saxons decided to attack and not attempt to run away (?) and so after three turns advancing towards each other (and a barrage of arrows from both sides doing little damage, the first Cog comes alongside. The Saxon Hearthguard attempt to board while downing some Levy and Warriors, losing one of their own.
Following a couple rounds of bloody slaughter, the Viking Warriors have been destroyed along with the Saxon Hearthguard. One of the Viking Hearthguard now boards the Cog and begins the slaughter of the Saxon Levy. Meanwhile the second Cog is bearing down.
After the second Saxon Cog comes alongside the Longship, it inially looks good for the Norse. The plan was to rest the exhausted hearth guard who had all but eliminated the Saxon Levy while the Viking Levy and second Hearthguard would deal with the new enemy...but it didn't quite work out that way. The Saxon Warriors and Hearthguard poured onto the Longship, and eventually destroyed not only the Viking Levy, but trapped and destroyed the exhausted Hearthguard as well. Now the Viking Warlord and his last remaining Hearthguards charged into the Saxons and incredibly destroyed the Saxon Hearthguard, Warriors and the enemy Saxon Warlord was killed in single combat by the Viking Warlord! The Viking Hearthguard joined their brothers in Valhalla, while their Chief looked over the bloodstained decks of the three vessels. And the Princess!!
All in all, a very enjoyable little fight! Used Blood and Plunder sailing rules and a few other minor alterations to take SAGA to sea, but it provided us with much enjoyment. Now where is that Mead?!

Wednesday, February 13, 2019

The Ambush is sprung!

Before the French even know the Viet Minh are there, I had the VM player roll a 6d to determine how many free shots he would get before the Card Activation Phase kicked in. Each unit, French (7) and VM (5), has a card in game deck which are drawn randomly to determine order. I love using this system rather than the old, 'You go-I go". Keeps the players involved. The VM were very well off by rolling a five! He chose to activate both 57mmRR, and three of his mortars. This in addition to two activated mines, one at the front and the other at the rear of the column (just as it happened in '49):
At the front of the column, the mine not only blew up the lead jeep, but took out driver as well. (rolled for both) The RR took out the Halftrack as well as one of the three men aboard. Fortunately for the French at this point of the column, a 60mmM was off target, missing the Scout Car behind the 'Track!
Towards the middle of the convoy, the second 60mmM was better operated as it destroyed the Radio Truck...No calling for support!
At the tail end, the second mine duplicated the first (bottom of photo) while the RR knocked out another 'Track, killing one. The third 60mmM targeted a Scout car but missed (middle top of photo)
Now the first turn officially begins with the VM MMG getting their first shots, but this one misses. The M8 AC turns and fires ineffectively into the jungle (A defender gets plus four on a defensive die roll, 6d, and if he gets above a seven, no effect. The Moroccans of the RCIM and a few drivers do get lucky when they score a Shaken (Yellow Cap) on one of the MMG. In my rules, the shooter rolls x1 6d for each fig firing. 2-6 at 1"; 3-6 at weapons medium range; and 4-6 at long. Moving lowers roll by one. If there are any scores on target, the defender rolls x1 6d, getting -1 if moving, 0 if stationary, +1 soft cover, +2 hard cover and the aforementioned +4 if in hard to spot jungle terrain. For every hit, the shooter then gets a 6d and needs to beat the defenders roll. If he does he gets a casualty. Equal die roll gets a Shaken (target cannot move or shoot next turn), and -1 gets a Pin (target may shoot next turn but not move. All targeted figs are randomized so if there were three figs in the target area, and three hits, there is a chance all the hits are on one fig. No Hollywood shooting here, all random.
The M8 HMC turns off the road and fires into the jungle hoping to suppress the mortar fire but fails. Drivers and RCIM are deploying along the road since there is no movement.
And at the tail of the column a VM MMG takes out a truck (but the driver successfully bails (right center of photo). French return fire is again very lucky as it scores another Shaken (Yellow Cap) on the same MMG crew. (top center). End of turn one.

Tuesday, February 12, 2019

Return to Indochina

    Several years ago, I staged Operation Castor (Parachute assault into valley of Dien Bien Phu in 1953), numerous small engagements between that village and Lai Chai, and then the ultimate battle itself at Tacticon. The final battle occupied some 18' x 15' although we only reenacted the battles of Beatrice, Gabrielle, Anne Marie, and the Five Hills over three days. All in 15mm and involving hundreds of figures (From Eureka and Old Glory mostly). Then it all went on the back burner so to speak as we moved on to newer fields of 'glory'.
    Recently picked up an Osprey Combat volume, French Foreign Legionnaire vs Viet Minh Insurgent and I was re-enthused. So we fought the 1948 engagement at Phu Tong Hua located along Route Colonial 3bis (RC 3bis). This post was found between Cao Bang in the north and Thai Nguyen in the south. The Post was held by100 Foreign Legionnaires with 4 North African gunners against 4 cos of Viet Mihn numbering some 224 men plus heavy weapons. The VM came from the east (lower left) and the north (top) to attack a bamboo and earthen fort. 1948 combat was certainly more primitive than latter engagements! Using a 2 fig=1man scale, the French barely held on to the post following a serious counterattack form the SE Bastion (lower right) as they did historically:

Now thoroughly hooked once again, I reread my copy of Lucien Bodard's The Quicksand War: Prelude to Vietnam, which is chockfull of gaming possibilities. Then went back to Bernard Fall's  Street Without Joy, which simply added to the options. An outline has been prepared, maps recreated, and a campaign hoped for! Going to try and refight these battles in historical order, so up next was the massive ambush along Route Colonial 4 (RC4) that took place in Feb 1949, between the French posts of Cat Bang and Dong Khe. The French were trying to hold on to the frontier forts they had prepared along RC 4 to control the area and to stop supplies coming across the Chinese border. If you goggle photos of this route you will quickly see of the impossibility of keeping these posts supplied by road. Miles of single road track, bounded by cliffs and jungle would lead to ambush after ambush. The largest, nearly destroyed a 200 vehicle convoy, and changed French tactics. The following battlefield is inspired by that fight:
The view if from the north hovering above the head of the convoy. It consists of 38 vehicles, including 13 of the Regiment of Colonial Moroccan Infantry (RICM), (actually an 'Armoured' unit consisting of M5 Stuart tanks, jeeps, halftracks, White Scout Cars, M8 HMC, and truck-bourne infantry), there for protection. The valley floor has a very small stream while the road is surround by Calcaires or limestone crags, filled with caves!
A close up of the head of the column. Each supply vehicle has only a single driver (shortage of personnel!), while vehicles 2-5 represent the first squad of the RICM. Look very carefully at the left center of photo, perched on top of a Calcaires...a VM 60mm mortar about to rain destruction on the French convoy!

Another closeup, this time of the middle of the convoy. 2nd Squad RICM to right. followed by a Radio truck and more supply vehicles. On the left side of photo you can make out an M8 HMC and the 3rd Squad RICM.
A final close up, this of the column's tail, with the 4th Squad RICM, vehicles 2-4 from bottom. The French troops are represented by about 60-odd figs, while the Viet Minh have a battalion poised to strike, numbering some 200 figs. If you look closely, you can spot a Viet Minh 57mm Recoilless Rifle (bottom left), and a MMG on cliff left of stream. The battle report will follow shortly.