The German Vanguard, the CL and TB to the left and the BC Lutzow, followed by her sisters, on the right with the CL Ebling and some TB investigating some smoke at extreme sighting range

The remainder of the German BC Fleet :


View over the arriving British BC Fleet with Lion leading, screened by CL and flanked by DD

On Turn Two, CL Ebling exchanged fire with the HMS Galatea at 8,000 yds. Despite to long range (10,000 yes max for CL and DD), it scored a hit! HMS Galatea and Phoeton returned fire and scored a Critical Turret hit, but fortunately for the Germans, there was no catastrophic blast!

On Turn 3, The Ebling was joined by the CLs of her Flotilla, most notably Frankfurt and Pillau, who all were in range of the Galatea. Two hits were scored and the British CL sank beneath the waves. Before she sank, Galatea joins with Phaeton again, but this time all were misses.

The German BC turned slightly to starboard to close the range:

The view looking over the British Fleet:

Turn 4 saw the range close to long range and the German Lutzow (at 17,000+) and Derflinger (at 19,000+) targeted the British leading ship, HMS Lion. They scored 3 hits but at that range all hits are halved, rounding down, so one score. HMS Lion, Tiger and Queen Mary all fired on the Lutzow and scored 4 hits! (rounded down to 2). This is the view for the British Fleet:

The same action as viewed from the German Fleet:

Turn 5 saw increased action as more of the BCs of both sides moved into range. As seen from the German POV, the Lutzow and Derflinger again fire on HMS Lion at 15,000 yes (no deduction now0 and score two hits and a Critical Boiler Hit which reduces Lion's movement by 3! The Seydlitz and Moltke range in on the Queen Mary at extreme range, but score 4 Hits (down to 2). Van Der Tann found that it's only target was a DD, but it missed. HMS Lion missed her shots against the Lion, but HMS Tiger scored two hits on Derflinger. At long range, the Queen Mary and Princess Royal scored two hits on Seydlitz (down to one)

And the view from the British:

On Turn 6, The German commander ordered the 11th and 12th Half-Flotillas of Torpedo Boats to the attack one from the head of the column and the second form the rear (right of photo). BC's continued to blast away at each other, with the Lutzow and Derflinger getting only one hit on the Lion. Seydlitz and Moltke were much more sucsessful, hitting the Queen Mary four times! Von Der Tann missed the Princess Royal at long range. HMS Lion and Tiger smashed the Lutzow with 3 more hits, while the Queen Mary and Princess Royal landed 1 hit and a Critical Engine hit on the Derflliger, dropping HER speed by 2. The "Little Boys" got into the action as well, with Frankfurt putting one shell into HMS Phaeton, which missed its shot back at the Frankfurt. The German TBs beginning to make their turn prior to their torpedo attack, but HMS CLs Birmingham, Dublin and Cordelia, smashed a shell into a TB, sinking her! (Top left of center)

Turn 7 and the battle cranks up tremendously as more and more elements were thrown into the fray. This overview shows the whole battle at the end of Turn 7, The Brits at the top, Germans at the bottom:

The German BCs score heavily this turn with the Lutzow and Derflinger landing 3 additional hits on Lion, nearly destroying her fighting capabilities. (only one gun remaining!) But its the Seydliz, Moltke and Von Der Tann which inflict the heaviest blow yet. They score 5 hits on HMS New Zealand which overwhelms her Protective Score of 4 in one turn (From the Jutland Game), causing a huge explosion, sinking the ship! (seen at right of British battleline and right photo). Meanwhile the German TBs G41, 86 and 87 amazingly put five torpedoes into HMS Tiger, seen second from left in British battle line! (rolled a two on the torpedo chart!). The British 9-10 Flotilla passes to the right:

HMS Lion and Tiger added 3 more hits on Lutzow, almost putting her out of action. HMS Queen Mary and Princess Royal score two more on Derflinger while HMS New Zealand and Indefatigable add two hits on Moltke.

On the northern flank of the fight, German 12th Half-Flotilla begins its run at the British and exchanges fire with the approaching British Destroyers. V69, V45 and V46 score a hit (and only one is necessary to sink her) on HMS Moorsom, while V50 and V39 sink the Laurel. (both sinkings seen top center of photo) HMS Moorsom, Laurel, Lyiard and Liberty all miss on their return fire! Not going well for the Brits at this point!

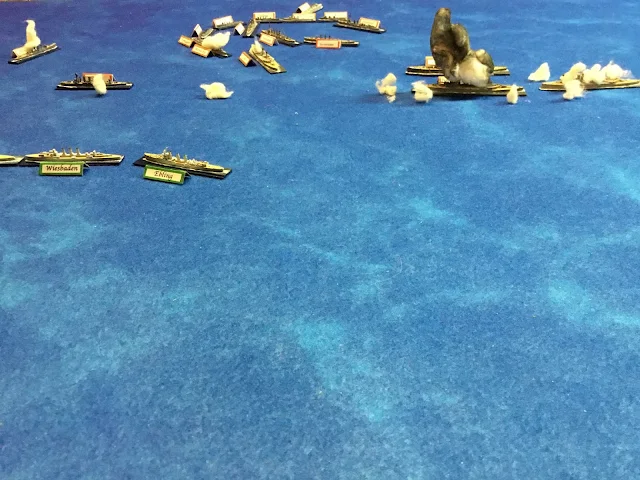
It doesn't get any better at the southern edge of the battle where CLs of the opposing forces lash out at each other. The Frankfurt misses the Phaeton (where only one more hit would have sunk her!), but the Pillau and Wiesbaden score 2 hits on HMS Birmingham sinking her! (seen top center of photo)(Two hits in one turn sink light cruisers) HMS Phaeton and Birmingham succeed in getting one hit on the Pillau, while HMS Dublin gets one hit on the Wiesbaden.
At this moment, HMS Phaeton spots and reports smoke to the south (its the German High Seas Fleet!). Orders were just being transmitted for the Battle Cruiser Fleet to come about and take a northern heading to escape, what with Lion nearly finished offensively at least, Tiger and Queen Mary in difficulty and New Zealand gone.

The only good news for the British is the arrival of the 5th Battle Squadron consisting of the powerful fast battleships of the Queen Elizabeth class, consisting of Barham, Valiant, Warspite and Malaya:

How things looked at the start of Turn 8, and a bloody round it would be with 9 ships going down, 5 British and 4 German:

It began with the British Fleet turning to starboard as the BattleLine went to pieces with two ships (Lion and Tiger) at reduced speed. It only got much worse as the Lutzow and Derfflinger targeted the Queen Mary. Just as occurred at the actual battle, a German shell struck one of the Queen's turrets, penetrating to the magazine, resulting in a tremendous explosion! (upper right) Tragically she had moved to the port-side of Tiger to screen her as she was struggling at half speed. The Seydlitz, Moltke and Van Der Tann added 4 hits on the Princess Royal for her first damage. (just astern of the exploding Queen Mary). The Lion and Queen Mary (shooting is simultaneous) fired at Lutzow but missed. Princess Royal scored 1 hit on Moltke but the Indefatigable almost helped even the score when she hit one of the Lutzow's turrets; but fortunately for the Germans they made their save. At the upper left of the photo you can see the CLs exchanging fire and yet again, British luck is terrible. The Phaeton is hit twice, sinking her, while the Pillau and Wiesbaden miss the Dublin. The Phaeton, Inconstant and Dublin all miss their counterparts! To add to the Brits misery, the Ebling scores a hit on DD HMS Moresby and sinks her!
 Seen at top-center of photo, the Indefatigable also sinks the V69 when a shell hits a torpedo just as the German TBs begin their run. G37 wastes its torpedoes at the Barham (out of the range of 6,000yds, at upper right) and V45, V46 and S50 launch theirs at Indefatigable but they miss. HMS Barham and Valiant each sink a TB, S50 and G37 (no better targets were available). A nasty fight erupts between British DDs and German TBs (about center photo). In the exchange, The British lose Liberty and Landrail, while the Germans see G86 go under:


Turn 9 saw the Lutzow pull out of the battle with severe damage, while the Derfflinger slowed down to allow the Seydlitz to take to the head of the battle fleet. (Seen left of photo) British DD were moving up to scene their BCs (top left) while German CLs were closing in for the kill (left edge of photo). German TBs (center) were about to finish off two lone British DDs which had attempted their own torpedo run the previous turn:

Seydlitz fired its forward guns on the Princess Royal but still scored two hits (very close range now), while the Moltke and Von Der Tann landed two hits on Indefatigable. Those two British BCs could only score one hit on the Seydlitz (British shooting continued to be poor). Ebling missed the Termagant, but Wiesbaden sank the Obdurate. Pillau and Frankfurt scored a hit on the Dublin, but she remained afloat. Dublin got a measure of revenge by scoring a hit of her own on the Frankfurt

Meanwhile, the fighting was furious between British DDs and German TBs. Both British ships (Lydiard and Morris) went down in their futile attempt to get within torpedo range, while the Germans lost the G87 to the Falmouth. The 5th Battle Squadron tries desperately to add its firepower to the crumbling British hopes, but the range is just to far, and the Barham's shells fall short of the Seedily

With their BC fleet battered and in disarray, the Admiral orders a smokescreen so his ships can withdraw. The German Admiral, seeing the fresh 5th Battle Squadron approaching, decides the victory so far is good enough, and orders his ships to head south (towards the High Fleet, which historically lead to the second stage of the Battle of Jutland...but thats for another day.

Losses for the battle for the British amounted to 2 BCs, 3 CLs, and 8 DDs. German losses amounted to only 6 TBs! British gunnery (or lack thereof), certainly doomed this Fleet!


