Sunday, March 20, 2022

Attack on St. Eustatius, 1666

 It has been a while since we had a Blood & Plunder game, as most of our moves have been on the map. This game involved a group of Buccaneers from Tortuga moving against the Dutch colony of St. Eustatius (which had actually been occupied by English Buccaneers out of Port Royal. When the attackers demanded 1000 pieces/eight in lieu of an attack, Captain Morgan (Henry's uncle) answered back, that Governor Modyford of Jamaica, would hang them as pirates. As the defenders burned their Bark drawn up at the dock (knowing they couldn't defend it, The attackers then landed many of their men south of the fort. Unknown to the attackers, the defenders had moved three groups of Freebooters and one of Sea Dogs into the woods, to oppose the advance.

As the first group of Zeelieden made it onto the table, some Freebooters rose up and blasted a volley into the Dutch, dropping four!

Two more additional Zeelieden appeared, answered by two Freebooters, who inflicted more casualties. 
The attacking commander now realized he had recruited no muskets for his force. He would have to make it into melee...
More and more Dutch arrive, while two 9lbers from the Fort (top left) score tow more hits...
On the third turn, the Dutch finally make contact and inflict the first losses of the English, but the Freebooters are able to retire in order towards the fort...
The will of the Dutch commander is finally broken as additional cannon fire and musket fire rip into his men. But the final straw was the counterattack of English Sea Dogs, who wiped out one of the Zeelieden units. He decided to attempt to besiege the English instead of a direct assault...
Til under time, may you make your saving rolls!


Sunday, February 27, 2022

Test of Honor:16th Century, Age of Sengoku

 The group has played several games based on the Test of Honor system. A possibility of a campaign has led me to restart painting my troops.

The following, from left to right includes the Clans of: Uesugi; Shimazu; Hojo; and Takeda. They show (from front to back for each) Samurai, Ashigaru Yari (spearmen), Yumi (bowmen), and Tempo (arquebus). These figures are from Footsore, Perry, and AW Miniatures.

A closeup of some Ashigaru, all from AW Miniatures...
Some Ashigaru holding Nodori 
The famous Daimyo Takeda Shingen, (Perry Miniatures)  the 'Tiger of Kai'...
The final photos (for now) are several very old samurai (from the 1980s), in fact so old I don't even remember their manufacturers. Fortunately the craftsmen making our miniatures today have come a long way!...
Four more Clans including (l-r): Chosokobe; Date; Mori; and Oda...


Thursday, January 13, 2022

Another Attempt at Kherson:

 Following two days of ineffective artillery bombardment, the Reds moved into the eastern suburbs and began pushing towards the Station. Meanwhile they launched another wave of men from the north as well.

While the Red Artillery failed to inflict casualties, the French Armored Train (offboard) and MMG to the right of Station, succeeded in dropping a total of four from one unit although it passed its morale check... 

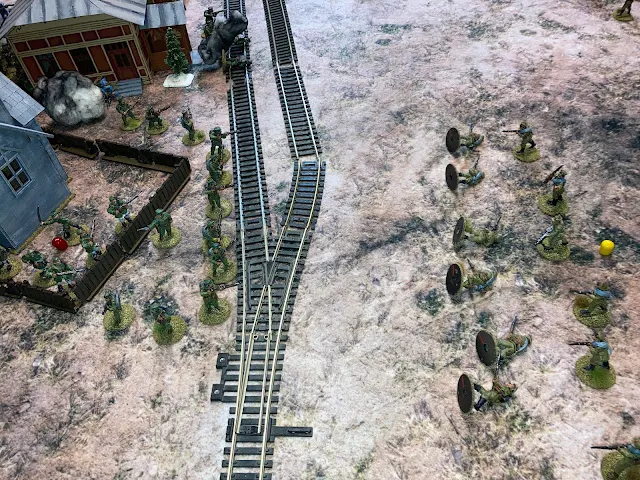
At the end of the first turn, a Bolshevik unit appeared on the Greek's flank, from the eastern suburbs. Being a low-trained unit, they can't move and fire, so they had to wait for the Greek response. It was quick and deadly, as half of the unit was mowed down by the Greeks in the house on left along with the Evzoni in the cemetery. They also failed their morale, so they could not advance until they recovered (if they got the chance). The only possible good news was the Evzoni rolled for low ammo! Another such roll (x2 1s vs x1 6) and they would be out of ammunition!
Turn Two on the Red's right flank saw the unit take more losses from French Artillery and MMG fire, and losing their morale, are suppressed now as well. Two additional Red units passed them by to their left...
At the Station, enthusiastic Red Guards pushed quickly forward, but like their compatriots further to the left, they can't move and shoot. The Greeks along the RR tracks punished them as well, with half the unit going down. They too, came up short on their morale roll and they are suppressed! At least the Red Artillery finally found the range and destroyed a French MMG (upper left) and two Greeks dug in along tracks. (to the right of MMG)
The remaining half of the Red troops in the eastern suburb chose to fire at the Greeks inside the building to the left, but they missed everything! The Greek return fire was nearly as deadly as the first, as only the unit officer survived. Miraculously he passed his morale and didn't have to retreat. Unfortunately for the Greeks in the house, they too rolled for low ammo!
At the start of the next turn, French Artillery downed another Red, while their MMG took two more! Surprisingly, the 'Bolshies' passed their morale check...for now.
The Greeks started taking casualties in the house facing the eastern suburbs...
Bolshevik Artillery finally scored as they destroyed a French MMG along with two Greeks at the Station House. The Greeks failed their morale and so are suppressed (yellow cap)...
In turn Four, the Bolshevik unit that passed their morale on the right, failed this time. Losing more men plus both their commander AND the Commissar, virtually guaranteed that result...
Luck finally caught up with the Red Guard unit as well when suffering more casualties they became suppressed...
Back at the House, the Greeks moved more men to be able to bring fire on the Reds in the eastern suburb. Fortunately for them, no attacks took place this turn (Reds were pulling back and rearming)...
Turn Five saw the routing of the Red unit on the far right. An exchange of fire at the Station saw a Frenchman go down, but more numerous were the Red's losses. This unit went low on ammo (red cap) and failed morale check forcing it to retreat next activation (two yellow caps)...
The Greeks succeeded in breaking the Red Guard (literally one man, the NCO!), but they suffered two casualties as well...
The Greeks holding the House dropped two Reds, but seeing that they will be outflanked may cause them to retire or counterattack next turn...
On the next Turn, the Bolshevik attack on their right is in complete retreat, one unit with one man left...
The attack in the center is not much better (one lone Red Guard fleeing, while the men facing the Station House are suppressed. Support is moving up (lower left) but better yet for the Reds, The Greek Unit in front of the cemetery has run out of ammo! (two rep caps)...
In the eastern suburbs, while one Red unit is suppressed, another is coming up in support. The Greeks who retired out of the house, have sent word to the French commander in the Station House; help is needed!
Turn 9 saw the Whites miss with their artillery, but the Reds brought down one Frenchman (center of Station House). The Greek unit which had run out of ammo, decided to fall back (top left center)...
Over at the eastern suburbs, the Greeks charged into melee, and proceeded to lose in a 2-1 advantage fight! Fortunately for them they passed their morale check. Meanwhile a 'Bolshie' unit (bottom right) which had lost men to the Evzoni, gambled that they would get the initiative before the Greeks next turn, by charging into the open towards those Evzoni...
Turn 10 saw the Reds shoot down one of the retreating Greeks, while the Greeks in the Station House brought down one of theirs. And both passed their morale...
Evzoni on left after shooting down some Reds, go out of ammo!
The gamble payed off as the Boshevik got the initiative and blasted down three Evzoni who finally failed a morale check! Before they ran out of ammunition, the Greeks did get two Reds in revenge. Not good for the Allies however...
The lone White unit with the Allies, failed its morale (very shaky at best) and so failed to move forward ( seen at top). The last French MMG redeployed next to the Russians while the melee between the Greeks and Russians (at bottom) continued...
This time, the Greeks did very well. After defending themselves with no losses (and getting two Reds!) against the counterattacking Reds this turn, they succeeded as all four Greeks defeated their enemies, which broke the Reds morale to boot! Great time for that to happen as it appears the Allies will continue to fall back in this sector...
Turn 11 saw the Reds inflict two more casualties of the retiring Greeks, including the units officer, which helped caused them to fail their morale...
The unit of Whites recovered their morale, while the French MMG got one casualty near the Church (before a Greek unit retired into their line of site), but it was the unit's officer! May help the Evzoni withdraw from the cemetery (lower right)...
Turn 12. This could be it. Can the Allies make their move successfully to Kherson's riverfront and possible evacuation? A Bolshevik unit charged into the cemetery, only to be greeted by fire from the Greeks still holding part of the Station House. Three Reds go down, and they become suppressed. Most of the Reds cannot pursue the Allies so hope grows...
While the White unit continues to advance (a great surprise), The Greek Howitzer places a well-aimed shot that takes out two Reds...and they become suppressed! The French MMG downs two Reds including the unit's LMG! No Bolshevik unit can advance. All three Greek units retire, although the poor Evzoni only roll a move of 3"! Guess they don't like retreating...
With the closest Bolshevik units all suppressed, the Allies successfully retired towards Kherson's waterfront and evacuation. It was quite the fight.


Wednesday, January 12, 2022

The Reds are Holding the Village

As we continue to try out the Rule Set "Set the East Ablaze", the scale gets a little larger. The 'Bolshies' (which I've learned was a British term used for their opponents) are housed in the town, trying to stay warm indoors on a typically chilly Russian winter day. There are troops in the Manor House (mid-right); an Austin-Putilov AC you can just make out parked in front (seen above the Church onion-dome); more troops in  the smaller Dacha across the road to the left; with a Cavalry unit (horses tied up outside) in the house between that Dacha, and the second across the street (with more troops) towards the bottom of photo. Finally there is a detachment of Kronstadt sailors housed in the Station House at the bottom along with an Armored Train (with two gun cars, a MG car, and an external MG at end of train). This photo actually shows the end of the first turn and the sentries are alerting the garrison. You can make out two dead horses at the crossroads, and that will be explained in the next photo...

Looking over the attacking White forces. Left to right we have a detachment from the Kornilov Division (Crack troops they); two Cavalry units (at the head of the column, Don Cossacks); below the cavalry and to the right of the Kornilov men, two infantry units supported by a Maxim MG; a truck-towed Howitzer; dismounted Kuban Cossacks and a dismounted Don Cossack unit bottom right. An Austin-Putilov AC is advancing down the road and has opened fire at the string of horses it can see at the crossroads (the result you saw in previous photo)... 
Now the Whites are advancing all along the battle field. To the left, Kornilov along the flank, and Infantry to the perimeter fence of the Manor House. In the center, the mounted Don Cossacks made the mistake of plunging straight down the main road when unexpectedly, the Bolshevik AC came roaring down through the gate of the Manor House ploughing into them and spraying them with MG fire! All very costly to the Cossacks. The 2nd White Cavalry is peeling off the road to the right side of town while the Kuban unit is pushing forward as well. The Howitzer fires at but misses striking the Manor House...
Next you can see the Reds reaction. At the bottom the Kronstadt sailors are manning the various positions on the Armored Train. In the center, the slaughter of the Don Cossacks, while to the left Red Infantry is moving to the left while their cavalrymen have mounted up.
Turn three, the Red's AC finishes off the unfortunate Don Cossacks, while the second White Cavalry and the Kuban continue to advance...
The Whites are bringing pressure up on the Manor House, while the two ACs pelt each other with MG fire. The Whites actually get a suppressed marker on the 'Bolshie' which means that they cannot advance...
On the other side of town, there is a large melee involving White Cavalry against Red Cavalry and Infantry. The Whites get the worse of the fight especially against the Reds behind the fencing and are nearly wiped out (the remains are seen retreating in the upper left).  White infantry however gain the upper hand with the Red Infantry inside the Dacha (top center) and succeed in suppressing them. They also shoot down a number of the Red Cavalry (lower right). What the Reds wouldn't know right away is that the White unit with two red caps has just run out of ammo!..
Unfortunately for the Bolsheviks back at the Manor House, accurate MG fire has broken the Reds stationed inside the Manor House, and they have been completely routed. Even threatened by their Commissar (you can just see him on the porch of the Manor House) has failed to stop their flight, and they are out the battle. The Kornilov detachment is just reaching the other side of the House (upper right)...
...yes he has a megaphone, don't all Commissars!
I wish I could take credit for setting this picture up but I simply used the opportunity when someone opened the blinds on the west facing shop windows creating this effect! (literally the setting sun) It looks so Dr Zhivago. Anyway, the routing Red unit from the Manor House are running so fast they are leaving their Commissar far behind. Above the very angry Commissar you can make out the remnants of the Reds who were stationed inside the Dacha routing as well (3-yellow caps) while their AC has pulled back to the crossroads (mostly obscured by the Church Dome again...
A better view of the deteriorating situation for the Reds on the other side of town. Their lone surviving Cavalryman (upper left in road) and the AC at the crossroads with the routing infantry to its right. The final Bolshevik unit is seen along the fences (upper center) facing the White infantry closing in from the right...
With the Whites pouring in, the Bolshevik command decided it was time to retire. BTW, the Armored Train had virtually no affect on the fight. In fact, the die rolls for the Red Players were almost completely bad with the exception of the Infantry unit that smashed the White Cavalry at the fence. We are finding the Rule Set gives a fairly quick and fun game and we're planning on more. Dasvidaniya til later...